I’m deeply in love with NextAuth but this is the most confusing moment if you arrive at the library. The problem here is that we are in the middle of a version change and wherever you look at, you’ll find contradictions, even in the official documentation.
Probably you are asking yourself, then why are you writing this? First of all, I’m curious about the changes, this people always outperforms and I want to know what’s their next step. On the other hand, when Vercel published their last version, Next.js 14, they also published an incredible learning resource where they suggested to use the beta version of NextAuth. With all these evidences I told myself, you need to upgrade your knowledge as soon as possible.
At the moment of writing this article, Next.js 14 is cutting-edge, so you’ll need to install some dependencies that aren’t stable. Once again, remember, do it at your own risk. And for sure, maybe this is not the best idea for projects that are in production.
Installing NextAuth
Probably the most easy way to get authentication almost out of the box in a Next.js based project is using NextAuth. The project have been around for a while and it’s widely used. However, the support for the new app router is still in beta. At this moment NextAuth is a little messy. They have been called NextAuth for a while but after reaching their version 5 it looks like they are renaming the project to Auth.js.
It seems that there won’t be differences between installing the last NextAuth beta version or installing directly Auth.js library.
To install NextAuth you just need to run the next command in the terminal at the root folder of your project.
npm i next-auth@betaNext step is to generate a secret key for your app, this is used to encrypt cookies. It can be whatever string that you want, but for sure it’s better if you generate it randomly. As its own name suggest, please keep it secret 😉
To generate the key you can use, for example:
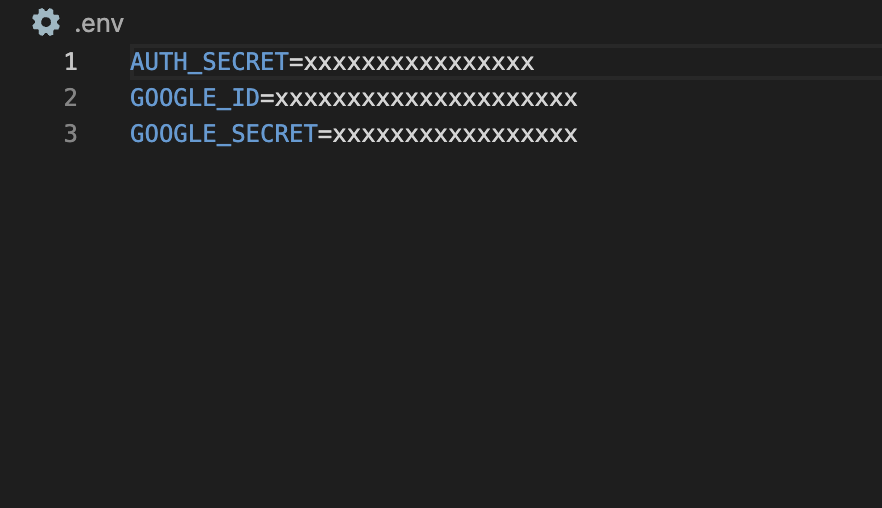
openssl rand -base64 32Now you must store the output of that command in your .env file with the variable name AUTH_SECRET
AUTH_SECRET=yoursecretOnce you go to production, these variables must also be set at Vercel project.
Basic configuration
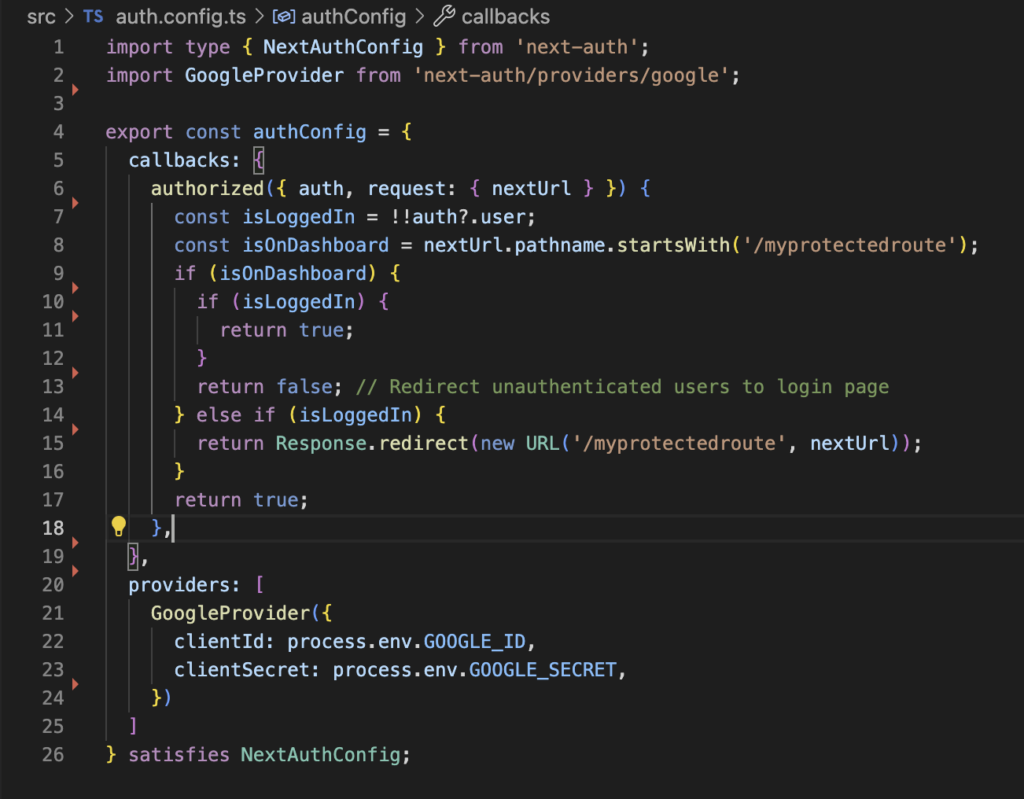
Now create a auth.config.ts file in your project’s src folder. The main objective of this file is to export a valid authConfig object that will be used to configure the behavior of the library.
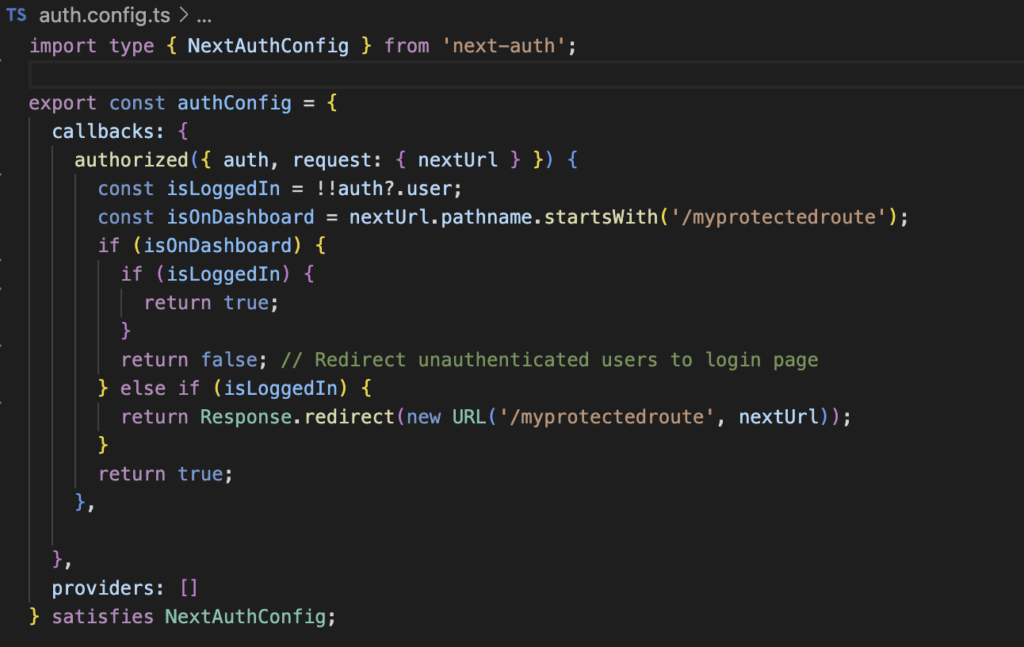
In this object we can fine tune a lot of parameters that help us to customize our experience with NextAuth.
One important tweak here appears in the “callbacks” section. We are adding that “authorized” function that will be our watchdog, the piece of code that will decide if someone can access or not to any of our app routes. The logic is pretty much in our hands here, at the end, if this function returns false then the user will be redirected to the login page and if it returns true she will be able to reach the route. The degree of complexity you choose to include is at your discretion.
This function will be used before a request is completed, so if someone is unauthorized, the page that is being accessed won’t even start rendering.
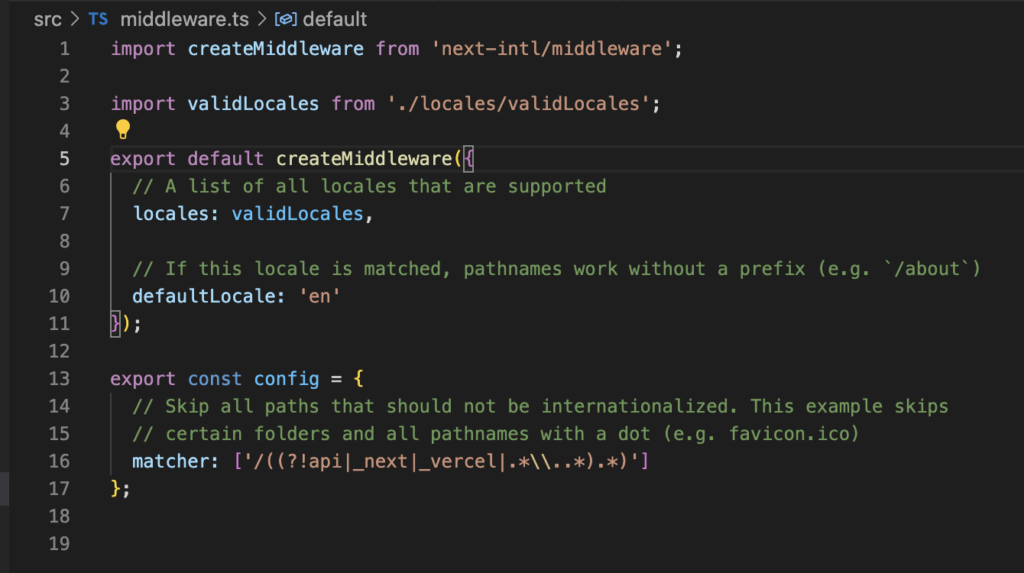
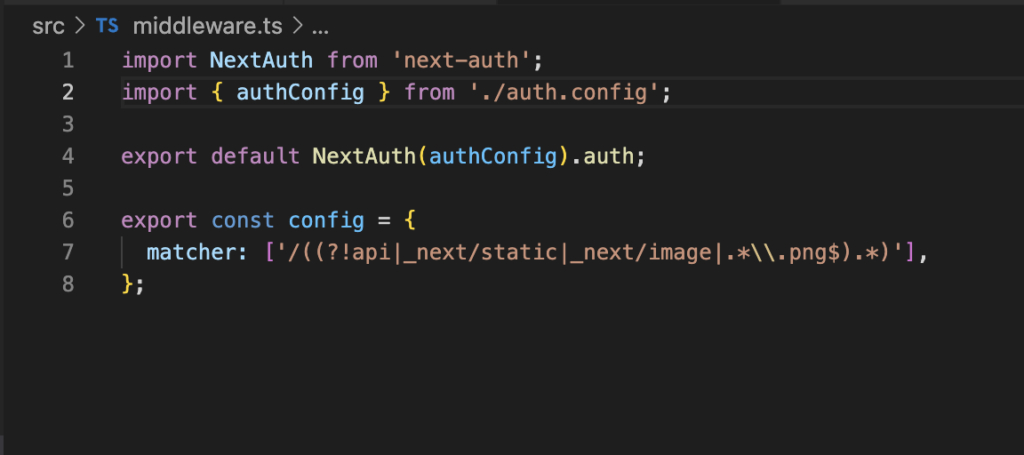
To make this work properly you need to define a middleware that uses this NextAuth configuration. As a convention, our middleware definition should be in /src/middleware.ts file.
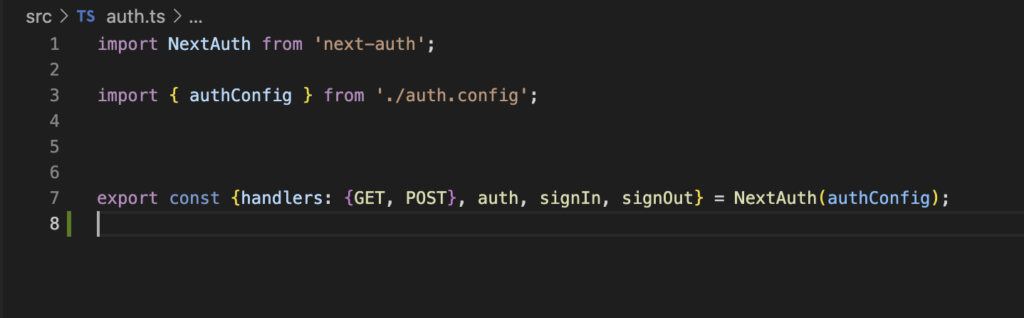
Finally we will generate a third file, called auth.ts, where we will export some functions provided by NextAuth.
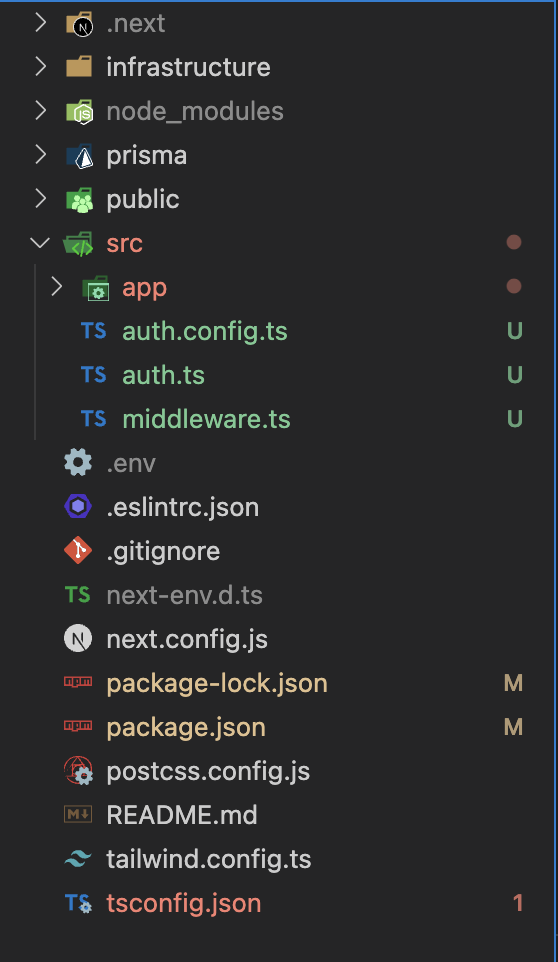
Your app’s src folder should looks like:
Setting up an authentication provider
Next step will diverge from the incredible documentation provided by Vercel because in their tutorial, they use a custom authentication provider but I’m more interested in using Google as the provider.
To nail this goal, we need to reach our Google’s console and generate a new OAuth client ID. The process is quite straightforward but if you never did it before, maybe it make sense to let it documented here.
On the first hand go to Google’s console and click on create credentials. Once you click in “Create credentials” you’ll see a small menu with a couple of options, select OAuth client ID.
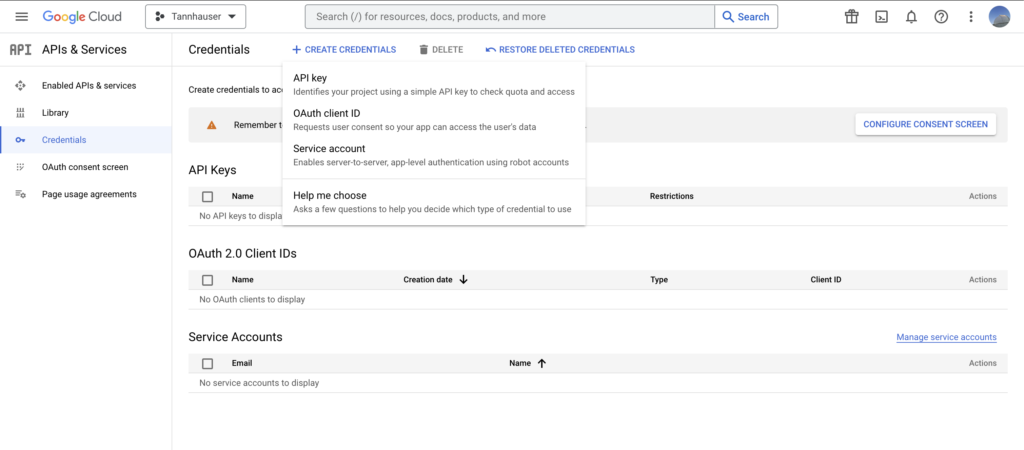
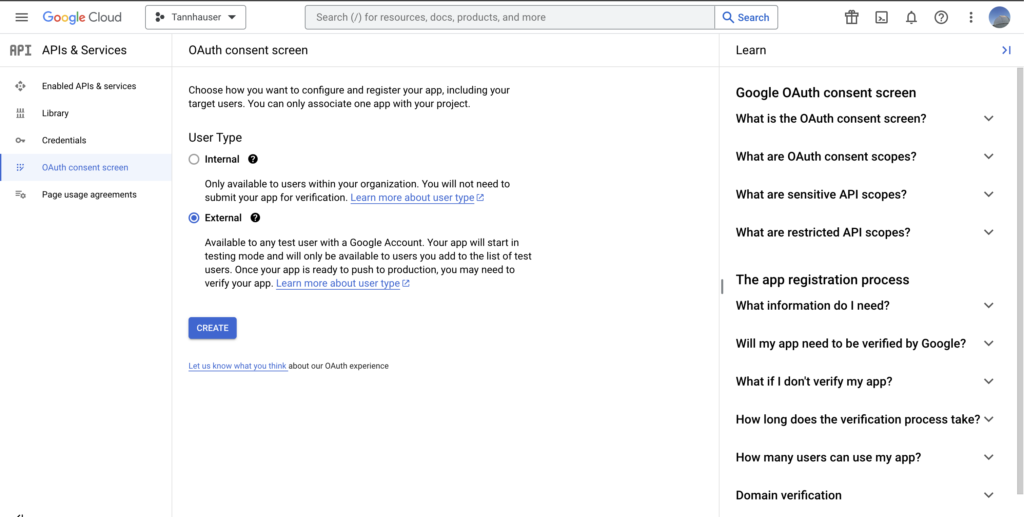
Now you’ll need to configure the consent screen to proceed.

Due to I want to make it accessible for anyone interested in testing our app, I’ll choose this option.
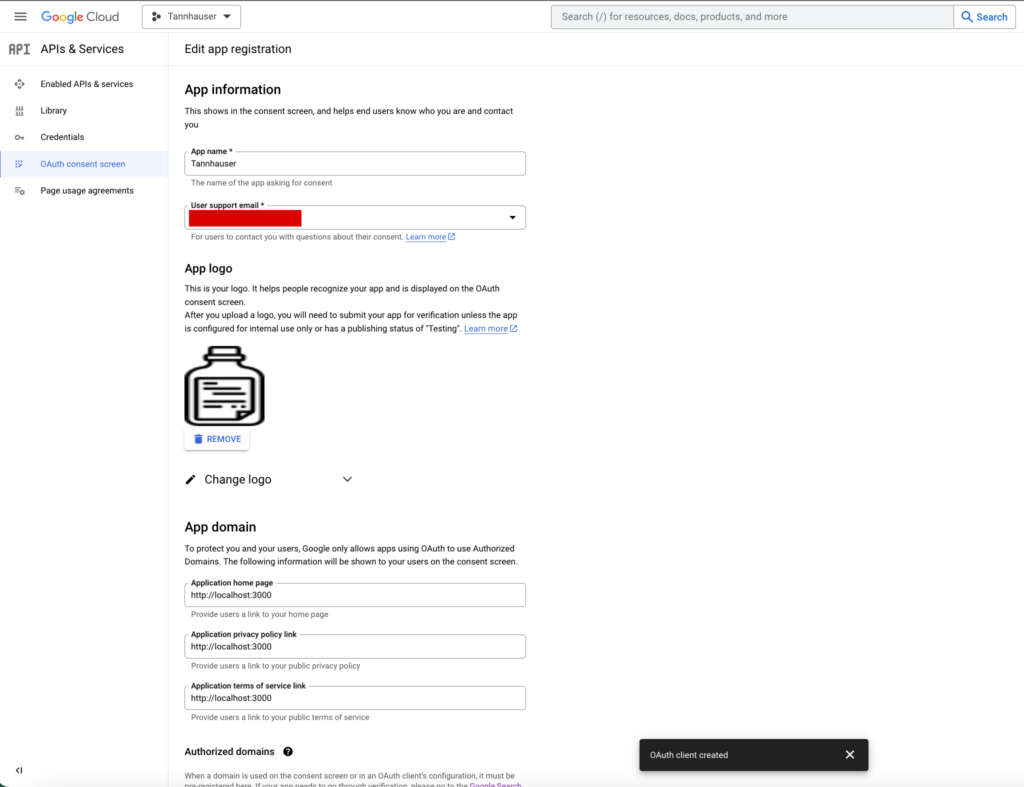
The only other value values that you should take care of are:
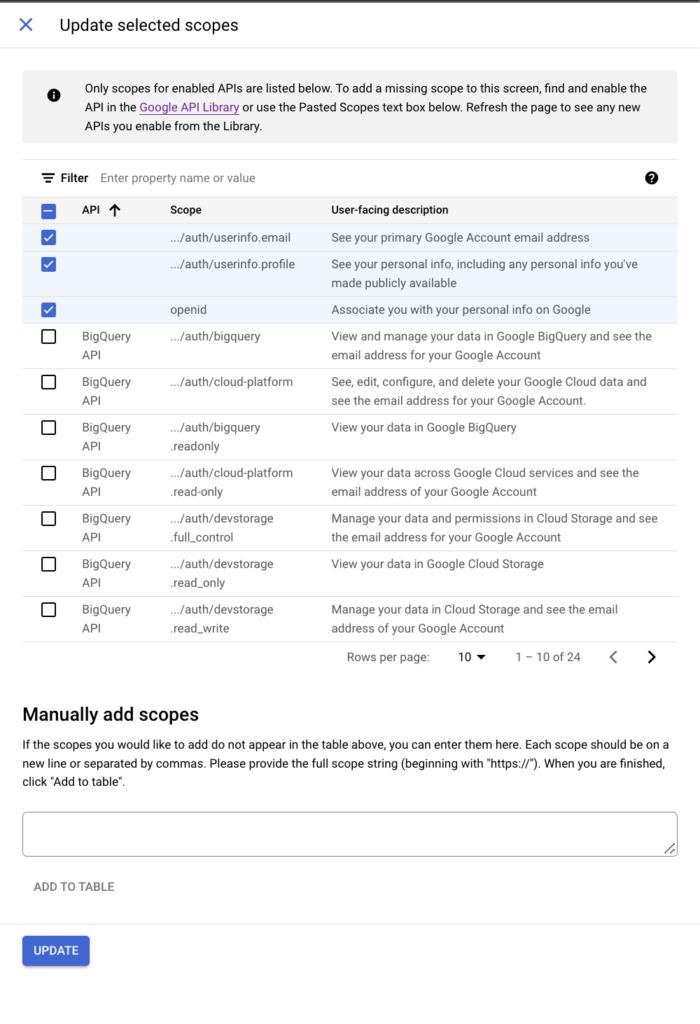
And finally the Scopes. The app scopes determine which user data your app will have access to. In our case we only need the user account and profile data just to show here a wonderful avatar.
And after that you should click again on create credentials, select OAuth Client ID and fill the form that will appear.
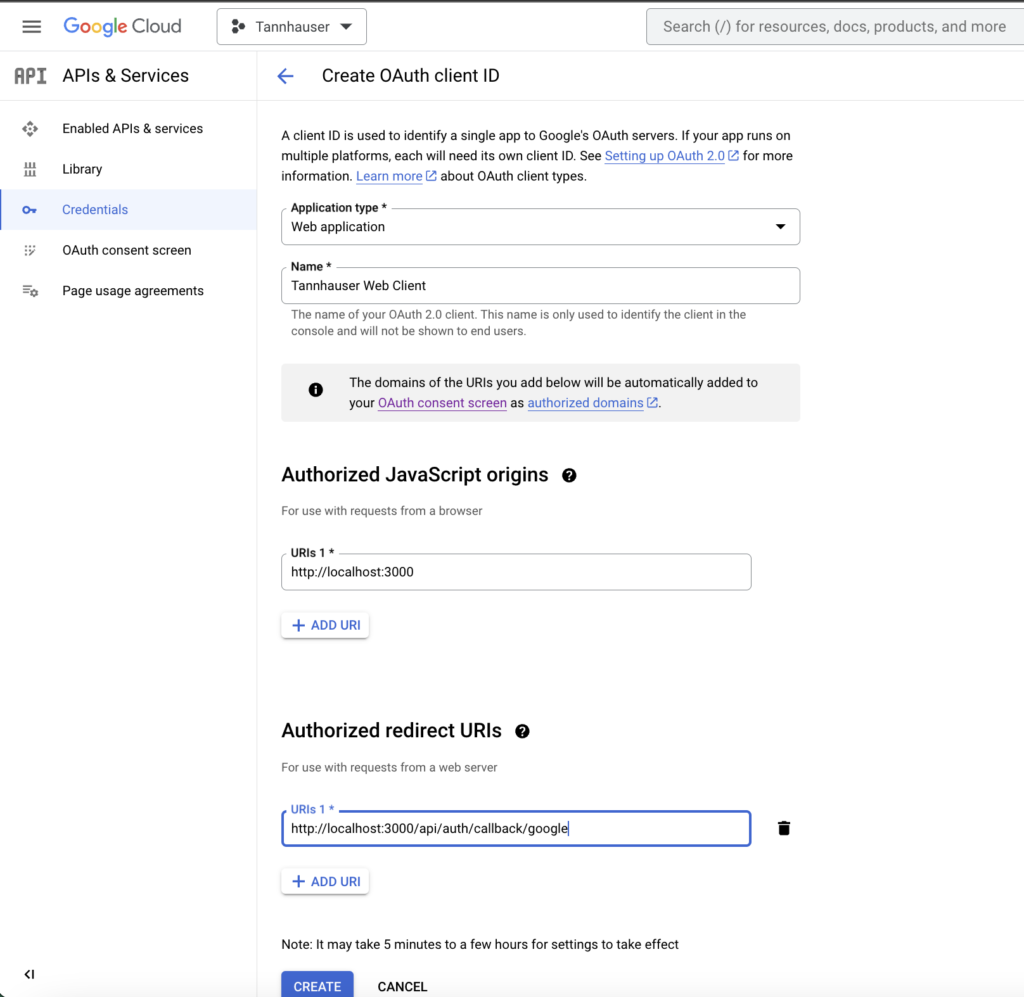
The only two key steps that you should take into account is to set the Authorized JavaScript origins and Authorized redirect URI’s as shown in the picture above.
Of course, this values are only for development, in production you should set your app’s real domain.
Ending with this process, Google will show you your credentials on the screen, you can use the button to download your credentials in JSON as you’ll need them in a moment or use the copy buttons.
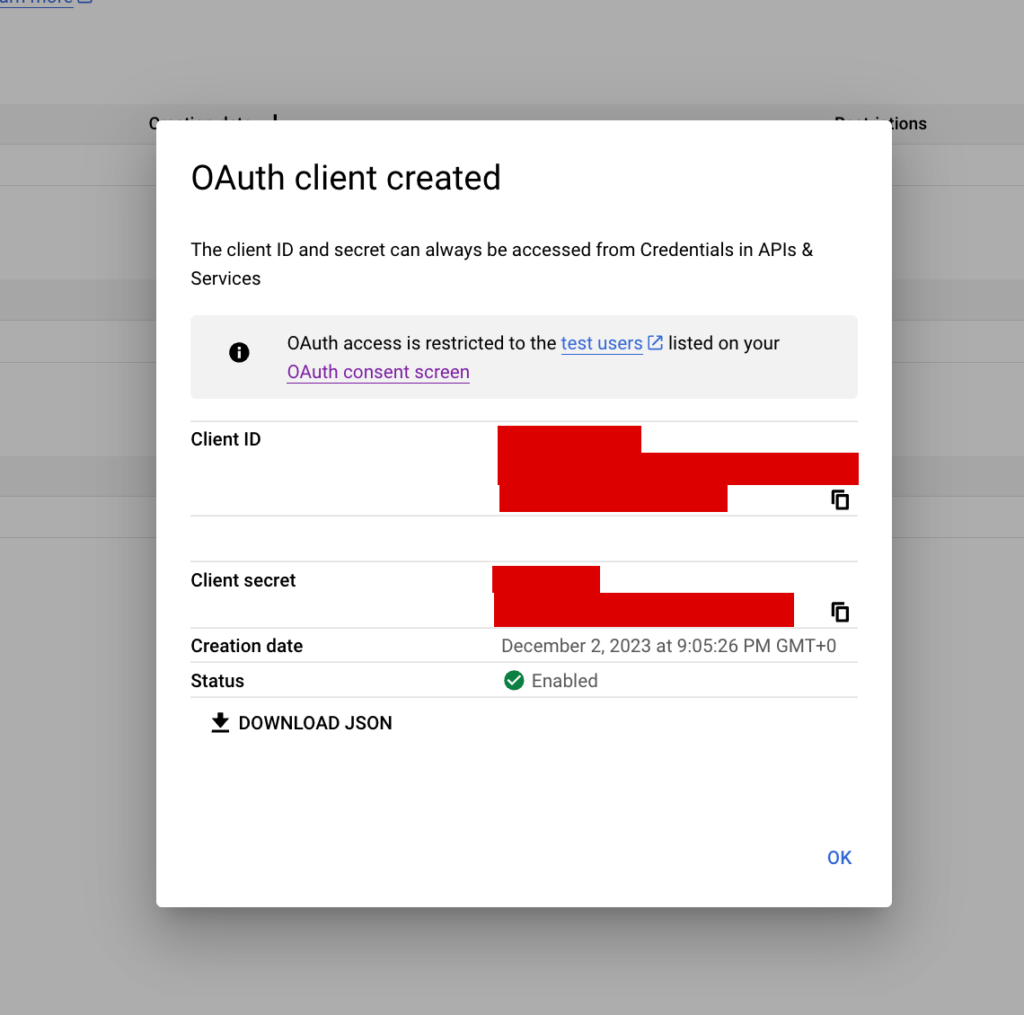
We need to store these values in our .env file.
Now we can go to our /src/auth.config.ts file and configure the Google provider. That file now should look like this:
At this point we just have a working authentication solution based on Google OAuth infrastructure. But I want to add an additional layer. I want to manage my sessions using my own database.
Auth Api route
We are getting closer to the end of this post, now we need to create a new folder structure this must be located in /src/app/api/[…nextauth] and must contain a route.ts file.

Inside this route.ts we will add the two functions that we are exporting in our /src/auth.ts file. When we receive a request that uses the http “GET” method it will be served by GET function and if we receive a POST, well I believe that you can guess what will happen then 😉

Managing sessions in your application’s database
In the last projects that I’ve been working on we decided to use Prisma to abstract our persistence infrastructure.
Probably I will write a new post about that, but I also believe that Prisma documentation is pretty good. So I won’t focus on its configuration process now. I will consider that you have a Prisma ORM in place up and running.
If that’s the case, then you can use one of the database adapters that NextAuth provides. The goal of this tool is to help us persist all session related data independently of the chosen provider.
To install all the needed dependencies for this to work properly you just need to execute the next command lines:
npm install @prisma/client @auth/prisma-adapter
npm install prisma --save-dev
If you have installed Prisma before in your project installing only “@auth/prisma-adapter” should do the trick.
Adding this adapter only requires you to make a little update in /src/auth.config.ts file.
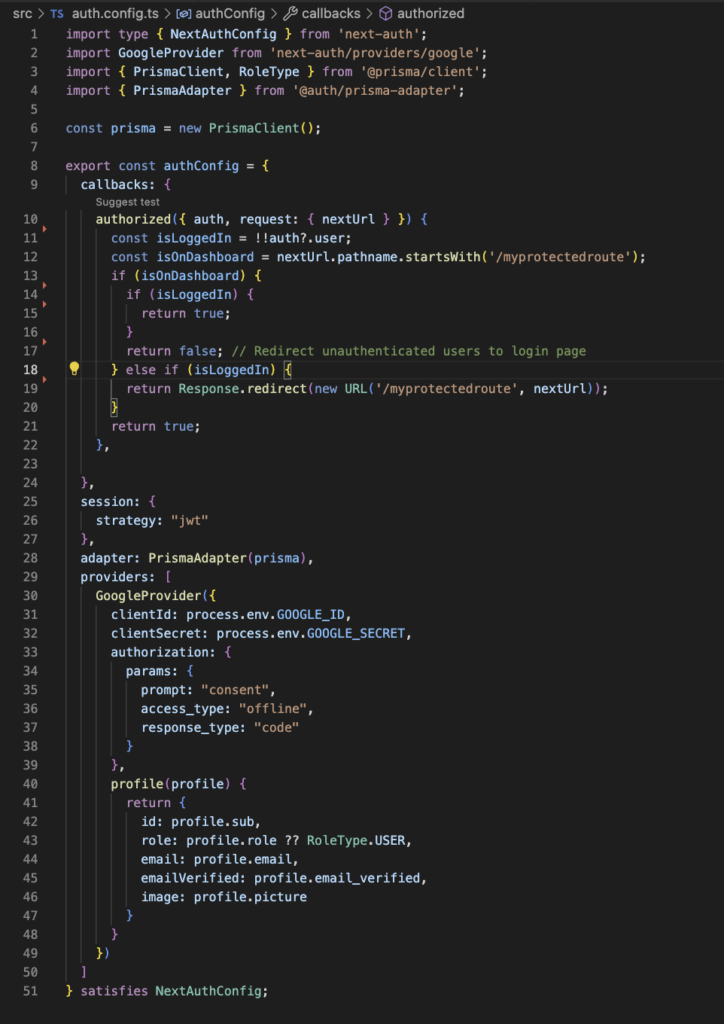
Basically it consists in adding the import for PrismaClient and configuring PrismaAdapter as the adapter that we want to use. We also configure it to use JWT for session maintenance.
One important detail is that Google only provides Refresh Token to an application the first time a user signs in, so if you were doing tests and didn’t take care of this and you think that you’ll need that token, take a look at this link.
In fact, the lines from 33 to 39 are absolutely optional but they address that small problem. You can add these to force google to send this data again.
After that you’ll need to update your Prisma Schema to add the models that NextAuth needs to keep track of your future users sessions.
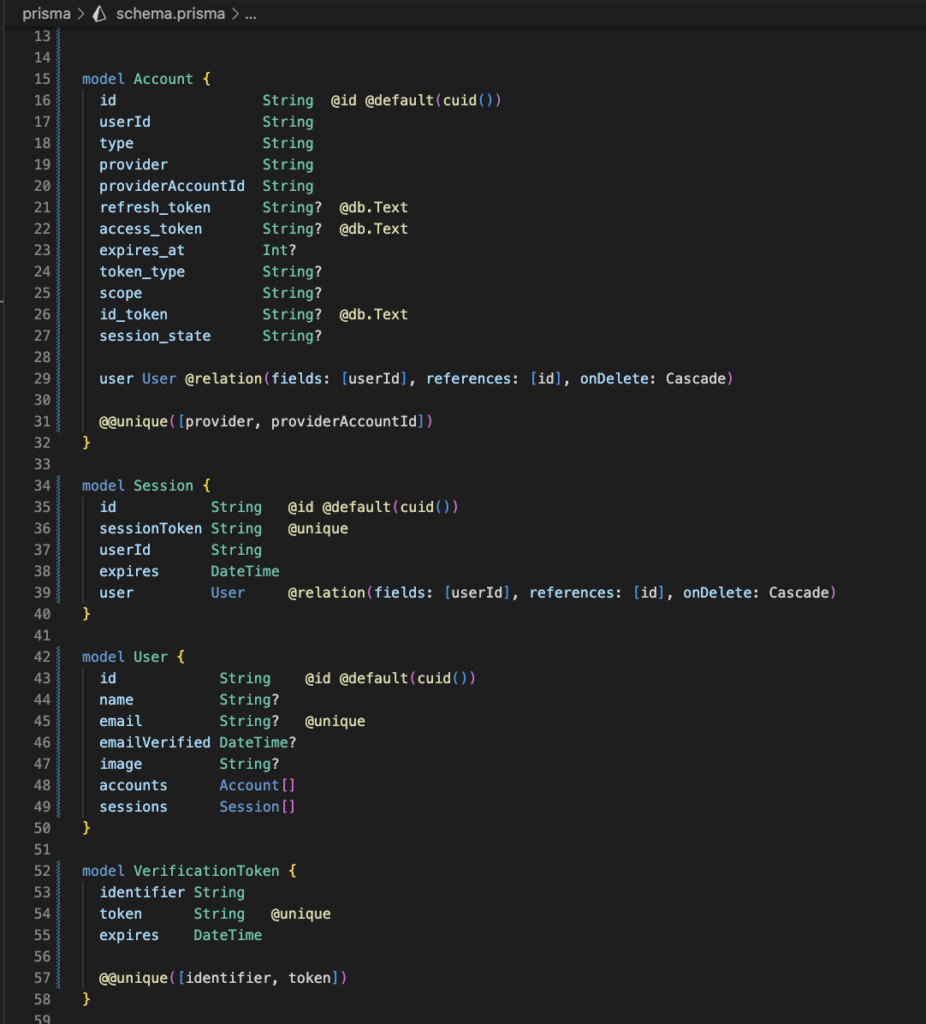
This model is provided by NextAuth on its documentation you only need to update your schema.ts and update your database using Prisma cli tools.
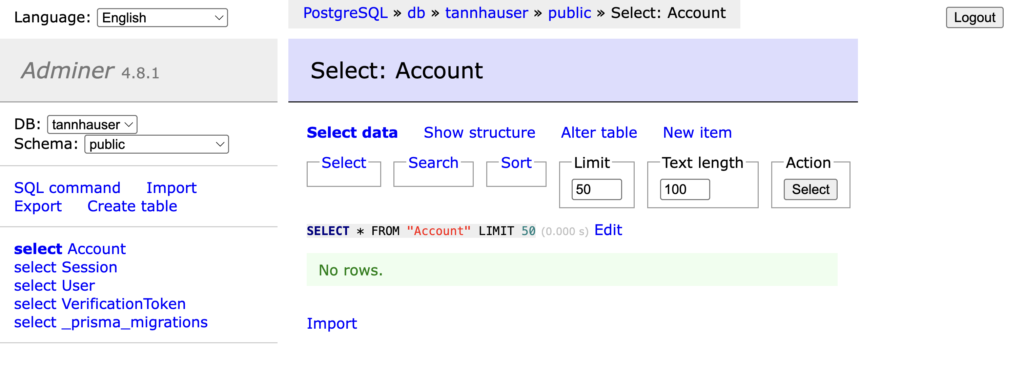
In my local environment I use a couple of Docker containers to emulate how my app will be deployed in the real world, one of them is an image of adminer, that is a kind of database CRUD web UI.
As you can see, before login in for the first time, my database is empty.
If you remember, we defined an API route inside our app folder it’s time to use it. We have signIn and signOut endpoints for free. Don’t you believe me? Ok just point your browser to http://localhost:3000/api/auth/signin
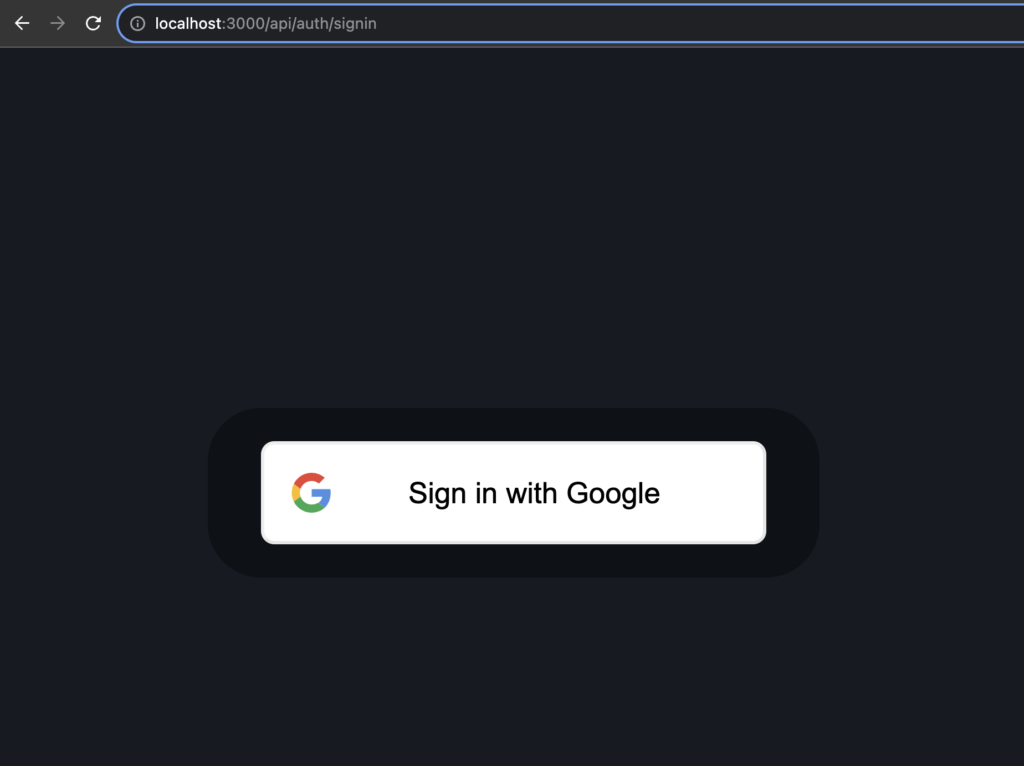
If you click on the button you’ll see the login procedure that you are used to when it comes to google’s ecosystem.
But the best part comes when you go to your development database an see it populated with your new user’s data.

A word about session strategies
NextAuth gives us the chance of using different strategies when it comes to persist the session data. Probably you noticed the value “jwt” in the session field of our last auth.config.ts screenshot. That field can take only two values “database” or “jwt”.
If you tried to use the database only strategy chances are that you noticed a weird error related to JWE encryption or something similar. At the moment of writing this post PrismaClient can’t run in Vercel’s edge functions, so we are forced to use the hybrid approach as stated here.
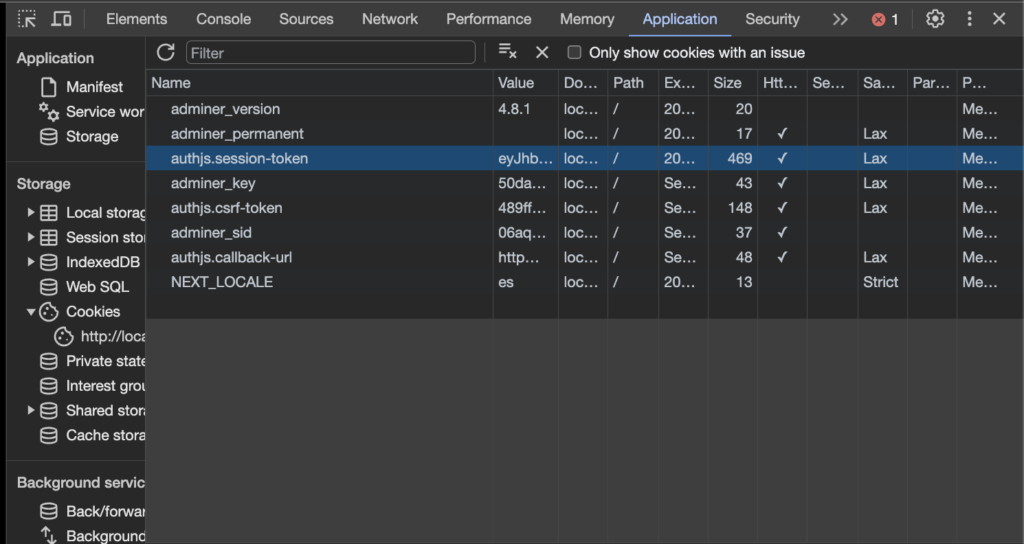
Under the hood we are using a hybrid approach, the session data is persisted in our database, but we still need to use JWT at some point to set an authentication cookie for our clients.
As you can see, here is the cookie.
Role based authorization
One of the most common authorization patterns is role based one.
With this approach you only need to assign a set of privileges to different user roles as if they where the groups in the operating systems realm.
We can implement this pattern in an easy way using NextAuth and the Prisma adapter.
In your schema definition file you’ll just need to update the user model in the way I show you in the next screenshot.
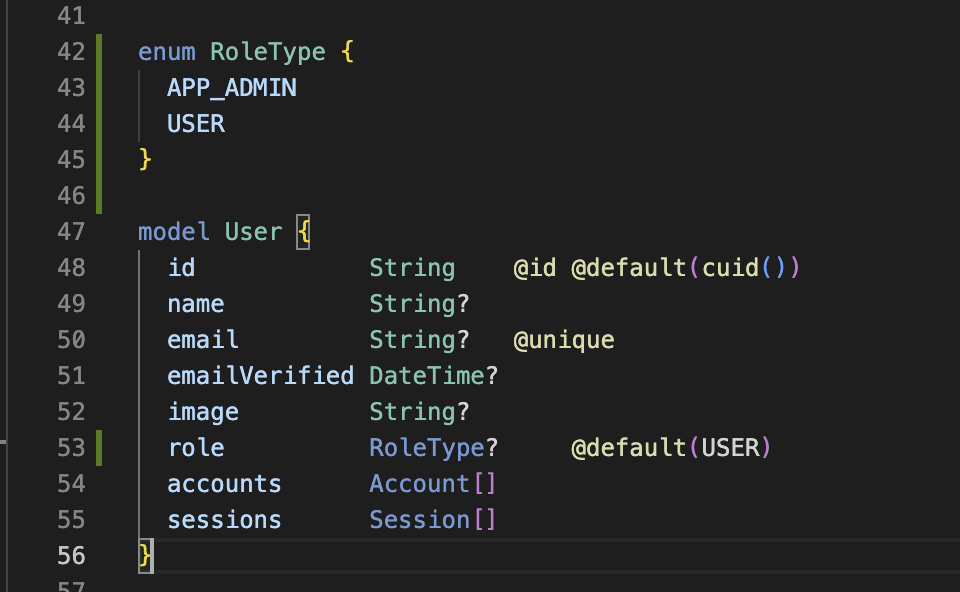
As you can see I’ve just added an enum with the different roles that I plan to support and just a new role field in the User model.
Remember to update your models in the database and making the migration.
After that you can create a profile callback inside the configuration of your Google provider, and let me repeat it, the profile callback goes inside the configuration of your Google Provider as you can see in the next screenshot.
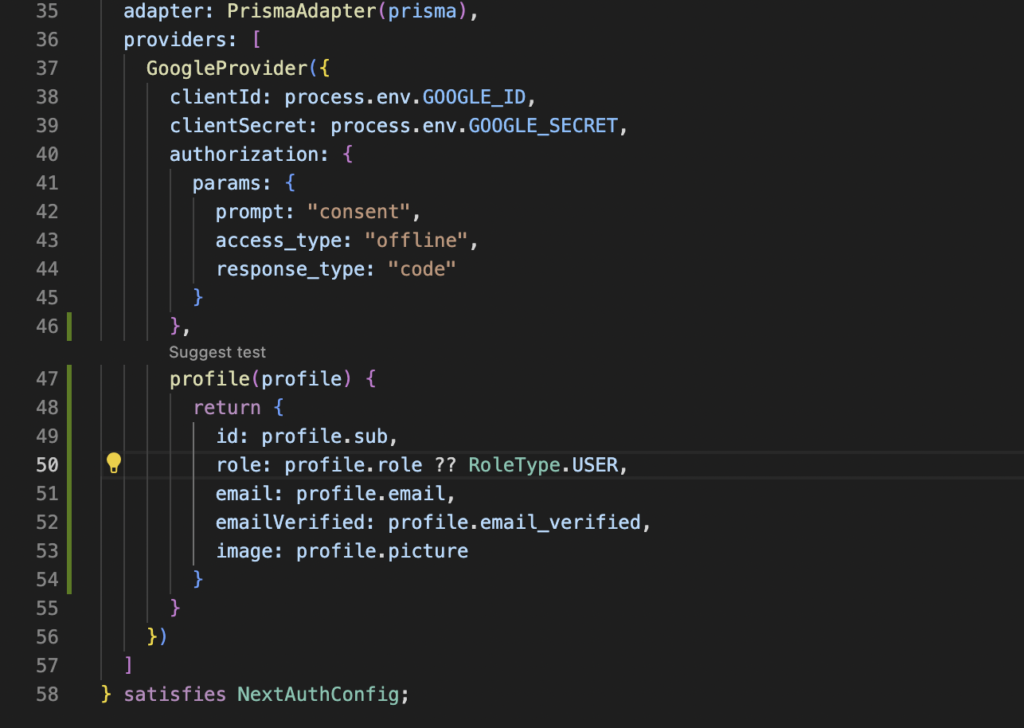
The object that you return in this function will be the one used to create a new user in the database. It’s important that you return an object that adheres to your Prisma model for the User entity, if you don’t do that, you’ll begin to experiment a lot of weird errors. On the other hand, you can enrich your user definition as much as you want inside this callback.
In my example, if a new user arrives to my app, it will receive an “USER” role automatically. If after that, I update that user in my database, my changes will persist as expected.
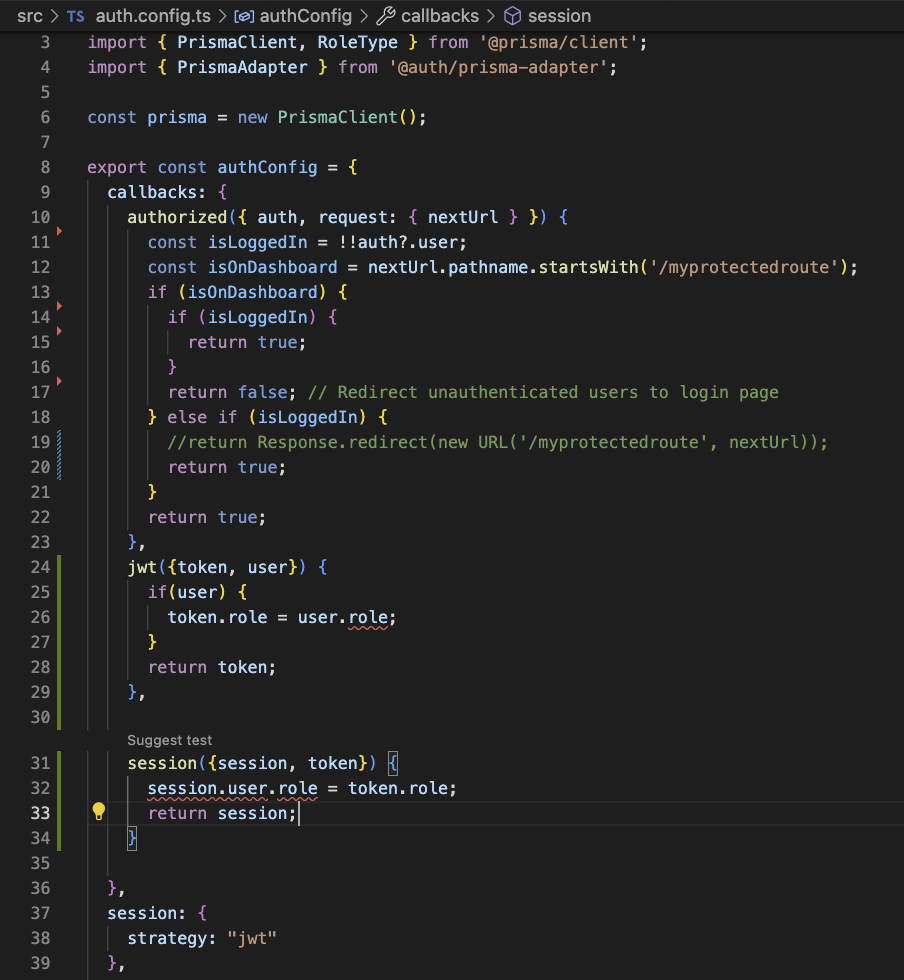
Finally, if you want to have access from your client side to the role, you should update both the jwt and session callbacks.
Authenticating API routes
The thing that impressed me the most of this version is how they have encapsulated all the functionality for authenticating server, client or api routes inside the auth function.
For this example I will use an small API route that retrieves all the users from the database and returns them. To implement it just create a route.ts file in a folder structure that makes sense for you inside your app folder. I will create it in app/api/v1/user/route.ts

After that you just need to define a function with the name of the HTTP method that you want to serve, a function called GET for “GET” requests, another called POST for “POST” requests and so on.
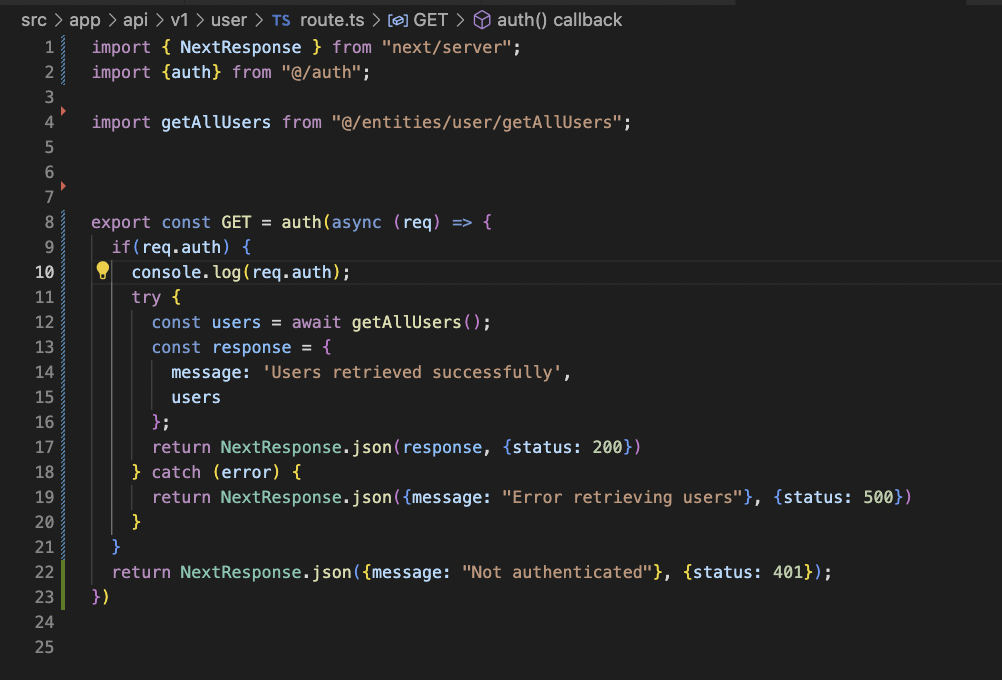
In this example I just gonna define a single GET function but, what’s new here is that if you pay attention the whole body of our function it’s wrapped by auth function. As you can see if Auth.js authenticated the request, we will have access to req.auth that will store the session object.
If req.auth isn’t in place we can be sure that the request wasn’t authenticated.
From the client side accessing that endpoint is as simple as hitting it using fetch or axios or whatever after the user is authenticated.
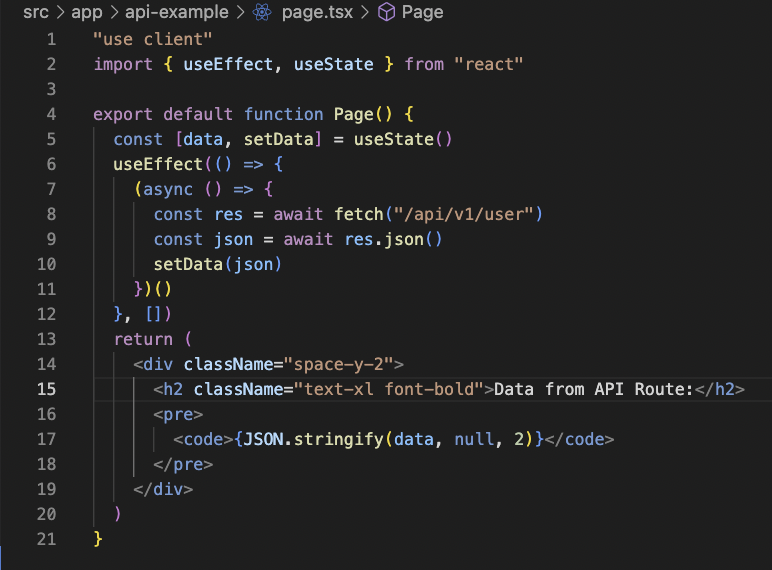
Finally, if you want to use another client like Postman, Thunder client, or whatever you only need to add a Cookie header that must include authjs.csrf-token and authjs.session-token values.
Resources
- NextAuth project
- Next learn, adding authentication
- How to add environment variables in Vercel projects.
- Interesting video about role based authentication using Next.js, NextAuth and Prisma
- Integrating multiple middleware Next-intl and NextAuth.
- Interesting video about how to setup google’s credentials in Google’s console
- Prisma documentation
- NextAuth Prisma database adapter
- Interesting video about setting Google Provider with NextAuth
- Interesting video about Middlewares in Next.js
- DaisyUI web
- Jack Herrington on NextAuth
- Migrating from NextAuth v4 to v5 official docs
- Google provider and refresh tokens issue
- Adapter compatibility problems with edge functions
- Role based access control with NextAuth experimental
- An example about accessing api routes from Auth.js git repository